
A Guide to Washing Machine and Dryer Upkeep
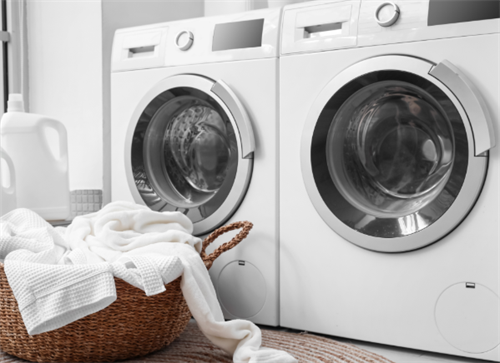
As early autumn’s chill sets in, line-drying clothes becomes a hassle—making washers and dryers essential for modern households. Yet, many people end up in a bind when trying to decide between washer-dryer combos (all-in-one units) and separate washer-dryer pairs.Here’s a complete breakdown of choosing, cleaning, and caring for your laundry tools.
Part 1: Washer-Dryer Combo vs. Separate Set—Which Fits Your Home?
Finding the perfect fit is all about balancing your daily routine, your home's layout, and the volume of laundry you do.
1. Drying Method & Efficiency
Separate sets win for energy savings. Most standalone dryers use heat pump technology: they recycle existing heat (no need to generate new warmth), cutting electricity use.
Combos rely on condenser systems, which heat air to high temperatures—using far more power. For frequent launderers, this adds up in utility bills.
2. Drying Performance
Heat pump dryers in separate sets operate at a gentle 42°C (108°F) average, preserving fabrics.
Gently cares for delicates, wool, and cotton, keeping them soft and shapely.
Combos use 60°C (140°F+) heat to speed up drying. This frequently causes clothes to shrink or stiffen—many people regret purchasing combos after ruining their favorite items
3. Capacity
Although combos usually claim '10kg wash, 7kg dry,' the actual drying capacity is often lower. Bulky items such as comforters and coats won’t fit, forcing you to separate the loads.
Separate sets have 10–12kg wash/dry capacity—perfect for family laundry. You can wash and dry an entire load, including large items, in a single cycle.
4. Lint Filtration
Dedicated dryers feature specialized lint filters that capture pet hair, fabric fibers, and dust.This prevents recontamination of clean clothes and improves air quality (great for allergy sufferers).
Combos lack dedicated filters. Lint sticks to clothes or builds up inside, fostering bacteria—frustrating for pet owners or anyone who sheds hair.
Part 2: Dryer Maintenance—3 Steps to Extend Its Life
A well-cared-for dryer works better and lasts longer. No special tools needed—just consistent effort.
1. Daily Checks
-Wipe the exterior: Use a soft cloth to remove dust, detergent spills, or lint from the outside.
-Empty the lint filter: Before each use, clear lint from the filter. A clogged filter restricts airflow, wasting energy and risking overheating.
-Clear the lint trap: If your dryer has a separate trap, empty it daily to avoid buildup.
2. Monthly Deep Clean
-Wipe the drum: Use a damp cloth and mild soap to clean the drum’s interior—removes fabric softener residue.
-Lubricate moving parts: Add a drop of lubricating oil to the drum’s bearings (check your manual for location) to reduce friction.
-Tighten loose parts: Secure wobbly screws, wires, or pipes—vibrations can loosen them over time.
3. Annual Maintenance
-Inspect the vent hose: Disconnect the hose and use a long brush to remove lint buildup (a clogged vent is a fire hazard).
-Check grounding & power cord: Ensure the dryer is properly grounded and the cord isn’t frayed.
-Thermostat calibration: Should you encounter uneven drying, it’s advisable to have a professional calibrate the thermostat to stop the appliance from overheating.
-Tighten base bolts: Secure loose bolts on the dryer’s base to reduce noise and instability.
Part 3: Washer Cleaning—Don’t Ignore This Hidden Germ Hotspot
A dirty washer is a health risk. Dirt, detergent buildup, and body oils become trapped between the inner and outer drums. Add moisture, and you’ll find bacteria, mold, and mildew. I learned this last month: my clothes came out with sticky black flakes, and the washer’s interior was covered in gunk.
Cleaning your washer is easy—choose between tub self-clean mode or washer cleaners.
1. Tub Self-Clean Mode: For Regular Upkeep
For cleaning every 1 to 2 months, the self-clean mode works best.Here’s why:
-High heat: It heats water to 90°C (194°F+), killing 99% of bacteria and loosening gunk.
-Fast spin: A high-speed spin flushes away debris through the drain.
-No cost: Uses only water—no cleaners needed.
Pro tips:
Don’t add detergent/cleaner! High heat will cause excessive foaming and overflow.
For hard water areas (mineral deposits), use a descaling cleaner occasionally—self-clean misses limescale.
Turn off auto-dispense (if your washer has it) to avoid detergent release during self-clean.
2. Washer Cleaners: For Deep Cleaning
If your washer lacks self-clean mode, or it’s been 6+ months since cleaning, use a chlorine-based washer cleaner:
-Fast-acting: Kills bacteria/mold in minutes (no hours of soaking, unlike peroxide-based cleaners).
-Easy to use: Pour the cleaner into the drum, select a normal 40°C (104°F) cycle, and let it run.
What to avoid:
Don’t mix with acidic products (vinegar, fabric softener, color-safe bleach)—creates toxic fumes.
Follow dosage instructions—extra cleaner leaves residue on clothes.

Part 4: Step-by-Step Washer Cleaning
Follow these steps for a sparkling clean washer in under an hour:
Step 1: Clean the Drum
Self-clean mode: Turn on the water supply, press “self-clean,” and let the cycle run (1–2 hours).
With cleaner: Pour the recommended amount of chlorine cleaner into the drum (not the detergent drawer). Run a normal 40°C cycle.
Afterward, wipe the drum with a damp cloth to remove leftover residue.
Step 2: Clean “Hidden” Spots
Three often-overlooked areas need attention:
-Detergent drawer: Press the release button to pull it out. Rinse under warm water, wipe dry, and reinsert.
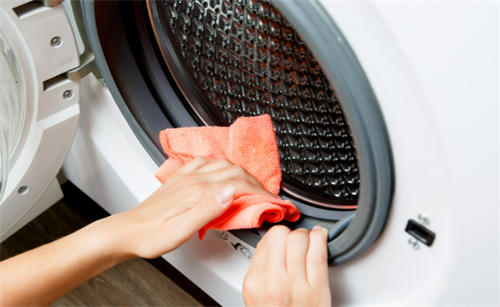
-Rubber door seal: Wipe the gasket (and its crevices) with a damp cloth and mild soap—removes mold and lint.
-Drain pump filter: Open the bottom-right (or left) door, place a towel/basin underneath, and twist open the filter. Empty, rinse, and screw back in.
Step 3: Keep It Dry
After cleaning, always leave the washer door propped open for 2–3 hours—even overnight if you can. The washer’s drum and rubber door seal stay damp post-cleaning, creating a perfect spot for mold and mildew to grow in the dark, enclosed space. Letting fresh air circulate dries these areas thoroughly, stopping mold spores from taking hold. This simple step keeps your washer smelling fresh and prevents musty odors from transferring to future loads of laundry.
Final Tips for Long-Lasting Appliances
-Don’t overload: Follow capacity guidelines—overloading strains motors and reduces efficiency. It’s easy to squeeze extra items into the washer or dryer to cut down on cycles, but this stresses the motor, leading to premature breakdowns. Overloaded washers can’t circulate water and detergent evenly, leaving clothes dirty or soapy, while stuffed dryers trap moisture, forcing longer drying times and higher energy bills. Always check the manual for weight limits—leaving a small gap at the drum’s top ensures proper movement and cleaning/drying.
-Clean spills immediately: Wipe up detergent/fabric softener spills to avoid damage. Liquid detergents and softeners are corrosive; even a small spill can eat away at plastic exteriors, fade painted surfaces, or gum up control buttons. Keep a microfiber cloth handy—blot spills right away, and use warm water for dried residue to prevent permanent stains or finish damage.
-Empty the dryer promptly: Wet clothes breed mold. Post-cycle, the dryer stays warm and humid—leaving damp clothes inside lets mold spores grow on the drum, seal, or lint filter. This causes musty smells on future loads and risks respiratory irritation. Fold or hang clothes immediately, or at least transfer them to a basket to air out.
-Check for leaks: Small drips become big issues. Every 2–3 months, pull appliances out slightly to inspect hoses and pipes. A loose washer hose or cracked dryer condensation line can drip water, warping floors, rotting subfloors, or shorting electrical parts. Catching leaks early saves costly repairs later.
RELATED GUIDES

5 Furniture Items You Might Regret—and the Reasons Why
We all want our homes to be visually appealing, radiate warmth and comfort, and operate efficiently so that everyday life feels effortless and enjoyable.
Is your toilet leaking? A simple DIY guide to fix uneven water flow in the toilet, saving you money and more money
The toilet tank is constantly refilling, or worse, water is steadily flowing into the bowl. Your first thought is one of pure dread—not just for the annoyance, but for the impending plumbing bill.
Mastering Sealant Application: The Key to a Durable and Beautiful Home
When it comes to home improvement and interior design, many people focus on large elements—furniture, lighting, flooring, or color schemes.
The Ultimate Guide to Furniture Buying: From Style Selection to Quality Inspection
You've finally decided it's time. That hand-me-down couch with the mysterious stain or the wobbly bookcase that's been with you since college has overstayed its welcome.