
How to sharpen kitchen knives at home?
At the center of every kitchen is a set of knives—tools we use every single day, whether for slicing vegetables, filleting fish, or carving a Sunday roast. Yet many home cooks overlook one essential truth: a sharp knife is safer, more efficient, and far more enjoyable to use than a dull one.
Why Sharp Knives Matter in Every Kitchen?
1. Safety First
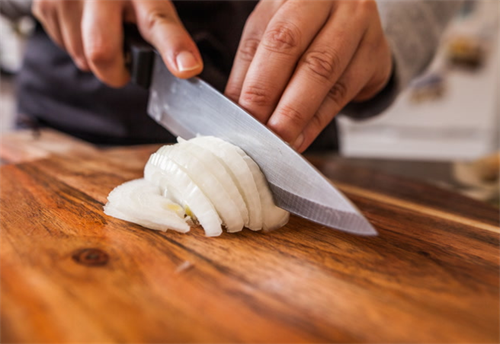
Many people assume that dull knives are safer because they are less likely to cut through skin. In reality, the opposite is true. A dull knife requires greater force to slice food, increasing the risk of it slipping and causing injury.A sharp knife, on the other hand, glides through ingredients with precision and control.
2. Efficiency in Meal Preparation
Anyone who has struggled to cut a ripe tomato with a dull blade knows the frustration of squashed produce and messy cutting boards. A sharp knife not only saves time but also reduces strain on your hands and wrists.
3. Better Presentation
Sharp knives make cleaner cuts, whether you’re slicing sashimi, carving roast beef, or preparing decorative garnishes. Presentation matters, and sharp knives allow you to create dishes that look as good as they taste.
4. Longer Lifespan for Your Knives
Regular sharpening maintains the blade’s integrity and prevents deeper damage over time. When cared for correctly, even budget-friendly kitchen knives can serve you well for many years.
Understanding the Anatomy of a Knife:
Blade: The main cutting surface.
Edge: The sharpened line that actually does the cutting.
Tip: The front end, ideal for delicate and precise cuts.
Spine: The thicker back of the blade that adds strength.
Heel: The rear part of the blade, often used for cutting tougher items.
Tang: The section of the blade that extends into the handle, providing balance.
By understanding these parts, you’ll better appreciate how sharpening impacts performance.
Different Methods of Sharpening:
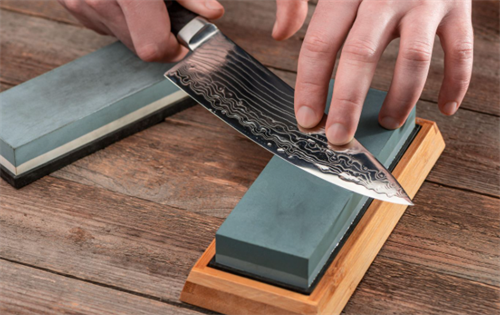
1. Sharpening with a Whetstone
The whetstone, or sharpening stone, is considered the gold standard. It provides control, precision, and a professional edge.
What You’ll Need:
A whetstone (ideally in multiple grit levels, such as 400, 1000, and 3000+)
A bowl of water or a spray bottle
A cloth or towel to stabilize the stone
Your knife, of course
Steps:
a. Soak the Stone
Let the whetstone sit in water for 10–15 minutes, giving time for the bubbles to dissipate completely.This ensures smoother sharpening and avoids heat buildup.
b. Find the Right Angle
For most kitchen knives, a 15–20° angle is ideal. A simple trick is to place one finger between the blade and stone—this usually creates the correct angle.
c. Sharpen in Sweeping Motions
Position the heel at the start of the stone and slide the blade in a fluid arc toward the tip, maintaining steady pressure and a consistent angle. Repeat on both sides, alternating to ensure balance.
d. Progress Through Grits
Begin with a coarse grit stone (about 400) to fix chips or restore extremely dull edges.Move to medium grit (1000) for sharpening, and finish with fine grit (3000–8000) for polishing.
e. Check Sharpness
Test by slicing a tomato, cutting paper, or feeling gently for resistance with your thumb pad (never swipe your finger along the edge).
Pros: Professional results, long-lasting edge.
Cons: Requires practice and patience.
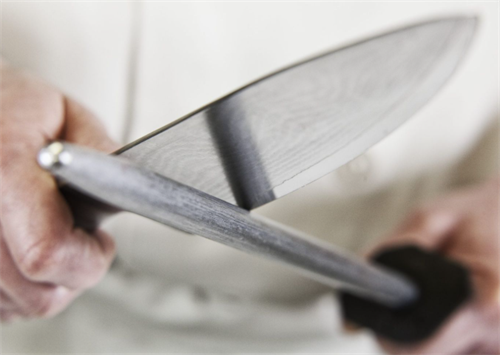
2. Honing with a Sharpening Steel
Contrary to popular belief, a honing rod doesn’t sharpen—it realigns the edge, fixing microscopic bends that occur during daily use.
How to Hone a Knife:
Position the rod upright, with its tip placed firmly on a cutting board.
Place the knife at a 20° angle against the rod.
Draw the blade down and across, from heel to tip, alternating sides about 6–10 times.
Regular honing can extend the time between full sharpenings, keeping your knives “kitchen ready.”
3. Manual Pull-Through Sharpeners
These are compact devices with preset slots, usually labeled “Coarse” and “Fine.”
How to Use:
Place the sharpener on a stable surface.
Insert the knife into the slot, starting at the heel.
Pull through 5–10 times, applying light pressure.
Pros: Affordable and easy to use.
Cons: Less precise, removes more material than necessary.
4. Electric Knife Sharpeners
For those who value speed and convenience, electric sharpeners are appealing. They automate the process and often deliver consistent results.
Tips for Use:
Always follow the manufacturer’s instructions.
Avoid over-sharpening, as electric devices can be aggressive.
Reserve them for mid-range knives; delicate or high-end blades may fare better with manual methods.
5. Creative Home Hacks
If you don’t have access to traditional tools, household items can come to the rescue.
Ceramic Mug or Plate: Turn a ceramic mug or plate upside down, using the unglazed ring on the bottom to hone your blade.
Sandpaper: Wrap medium-grit sandpaper around a rolling pin for a makeshift sharpener.
Newspaper: The ink contains fine particles that can help polish the edge.
Toothpaste: Acts as a mild abrasive for a quick touch-up.
While not a substitute for a whetstone, these techniques can quickly bring a knife back into working condition.
How Often Should You Sharpen?
There’s no single answer, as it depends on how frequently you cook and the type of knives you own. As a general rule:
Hone every few uses.
Sharpen with a whetstone or sharpener every 1–3 months for home cooks.
Professional chefs often need to sharpen their knives every week, or even every day.
The best indicator is feel: if your knife struggles with tomatoes or herbs, it’s time.
Maintenance Tips for Keeping Knives Sharp:
1. Use the Right Cutting Board
Avoid glass, marble, or ceramic boards—they dull blades quickly. Stick to wood or plastic.
2. Wash by Hand
Dishwashing exposes knives to high temperatures, harsh detergents, and constant movement, all of which can harm the blade and handle.
3. Store Properly
A knife block, magnetic strip, or blade guards are ideal. Tossing knives in a drawer leads to dull edges and safety hazards.
4. Avoid Hard Surfaces
Don’t use knives on bones, frozen food, or metal pans unless they are specifically designed for it.
5. Regular Honing
Keep your honing steel handy and make it a habit before or after cooking.
Troubleshooting Common Issues:
1. The Knife Still Feels Dull After Sharpening
One of the most frustrating experiences is putting in the effort to sharpen your knife, only to find that it still struggles to cut cleanly. In most cases, this is caused by the sharpening angle being slightly off. A kitchen knife generally requires an angle of 15 to 20 degrees, but even a few degrees outside this range can make the edge less effective. Beginners often hold the knife too flat or too upright against the stone. To improve, try using an angle guide or visual cues, such as stacking a few coins under the spine to help maintain consistency. If the blade is very dull, you need to spend more time reestablishing the edge before moving on to finer grits. Don’t rush the process—patience and steady strokes are key.
2. One Side Feels Sharper Than the Other
If your knife slices smoothly on one side but drags on the other, the problem is likely uneven sharpening. This happens when more strokes or pressure are applied to one side of the blade than the other. The solution is balance. Try to count your strokes—if you make six passes on the left, do six on the right. Also, focus on applying equal pressure throughout the stroke. Developing this consistency takes practice, but it ensures a symmetrical edge that cuts cleanly.
3. Chipped Blade
Small chips or dents are common if knives are used on bones, frozen foods, or hard surfaces like glass cutting boards. While these flaws may look severe, they can often be repaired at home. The process starts with a coarse whetstone, which grinds away enough material to smooth out the chip. This requires patience, as removing too much metal too quickly can shorten the knife’s lifespan. After the chip is reduced, progress to medium and fine stones to refine and polish the edge. For deeper chips, it may be best to consult a professional sharpener.
4. Rust Spots
Even stainless steel knives are not completely rust-proof. Moisture, acidic foods, and improper storage can all cause rust. Fortunately, small spots are easy to fix. A paste of baking soda and water works well as a gentle abrasive, while diluted vinegar can also dissolve rust effectively. To prevent rust in the future, wash knives promptly after use, dry them fully before storage, and consider applying a thin coat of food-safe oil to protect the blade.
Through the above introduction, it should be clear which method of sharpening the knife is better and their respective advantages and disadvantages. The sharpening method has also been explained in detail.Along with regular sharpening, proper upkeep plays a key role in keeping your knife durable over time.
RELATED GUIDES
Marble vs. Quartz Countertops: The Ultimate Guide for Your Kitchen Remodel
Hey there, home renovators and kitchen lovers!Let’s talk about one of the biggest decisions you’ll make during a kitchen remodel: the countertops.
Preventing Smart Homes from Being Hijacked by Hackers: 7 Key Security Steps
Smart homes promise convenience, comfort, and even energy savings by connecting everyday devices—like lights, cameras, locks, and thermostats—to the internet.
The Kitchen Work Triangle: The Ultimate Guide to Designing a Efficient, Enjoyable Culinary Space
The kitchen is more than just a utilitarian space for preparing meals; it’s a vibrant hub where morning coffee fuels the day’s ambitions.
5 Furniture Items You Might Regret—and the Reasons Why
We all want our homes to be visually appealing, radiate warmth and comfort, and operate efficiently so that everyday life feels effortless and enjoyable.